
Kitchen Handle Single Faucet Loose at Base: A Homeowner’s Guide to Diagnosis and Repair
Is your kitchen faucet handle feeling wobbly? Does it move excessively at its base, causing concern and potential leaks? A loose kitchen handle on a single-handle faucet is a common problem, but fortunately, it’s often a repair you can tackle yourself. This comprehensive guide provides a detailed walkthrough of diagnosing the causes, step-by-step instructions for tightening and repairing the faucet, and expert tips to prevent future issues. We’ll cover everything from identifying the faucet type to choosing the right tools, ensuring you can confidently restore your faucet’s stability and prevent water damage. This isn’t just about fixing a loose handle; it’s about understanding your plumbing and saving money on costly repairs.
Understanding Why Your Kitchen Faucet Handle is Loose
A loose faucet handle is more than just an annoyance; it can be a symptom of underlying problems that, if left unaddressed, can lead to more significant issues like leaks, reduced water pressure, or even damage to the faucet itself. Understanding the common causes is the first step towards a successful repair.
Common Causes of a Loose Faucet Handle
- Loose Screws: The most frequent culprit is simply a loose screw that secures the handle to the faucet stem. Over time, vibrations from regular use can cause these screws to loosen.
- Worn-Out O-Rings or Washers: Beneath the handle, O-rings and washers create a watertight seal. These components can deteriorate due to age, mineral buildup, or constant friction, leading to looseness and leaks.
- Corrosion: Mineral deposits and corrosion can build up around the faucet handle and stem, hindering smooth operation and contributing to the feeling of looseness.
- Damaged Cartridge: Single-handle faucets often use a cartridge to control water flow and temperature. A damaged or worn-out cartridge can cause the handle to feel loose or wobbly.
- Improper Installation: In some cases, the faucet may have been improperly installed initially, leading to premature wear and tear on the handle and its components.
Identifying Your Faucet Type
Before you start any repairs, it’s crucial to identify the type of single-handle faucet you have. The internal mechanisms vary, and knowing the type will help you determine the correct repair procedure and parts needed.
- Cartridge Faucets: These are the most common type of single-handle faucets. They use a cartridge to control water flow and temperature. The handle usually moves up and down to control flow and side to side for temperature.
- Ball Faucets: Ball faucets use a ball valve to control water flow. They often have a more complex internal structure than cartridge faucets. The handle usually pivots around a central point.
- Ceramic Disc Faucets: These faucets use ceramic discs to regulate water flow. They are known for their durability and smooth operation. The handle typically rotates a quarter turn to control water flow.
Tools and Materials You’ll Need
Having the right tools on hand will make the repair process smoother and more efficient. Here’s a list of essential tools and materials you’ll likely need:
- Screwdrivers: A set of screwdrivers, including both Phillips head and flathead, in various sizes.
- Adjustable Wrench: For loosening and tightening nuts and bolts.
- Allen Wrench Set: Many faucet handles are secured with Allen screws.
- Pliers: For gripping and manipulating small parts.
- Penetrating Oil: To loosen corroded screws or nuts.
- White Vinegar: For removing mineral deposits.
- New O-Rings and Washers: Have a selection of O-rings and washers on hand, or purchase a faucet repair kit specific to your faucet model.
- New Cartridge (if necessary): If the cartridge is damaged, you’ll need a replacement.
- Clean Rags or Sponges: For cleaning up spills and wiping down parts.
- Plumber’s Grease: To lubricate O-rings and washers for smooth operation and a watertight seal.
Step-by-Step Guide to Tightening a Loose Kitchen Faucet Handle
This section provides a general guide to tightening a loose kitchen faucet handle. Always refer to your faucet’s specific instructions or consult a professional if you’re unsure about any step.
Step 1: Turn Off the Water Supply
Before you begin any work on your faucet, it’s crucial to turn off the water supply to prevent flooding. Locate the shut-off valves under your sink (one for hot water and one for cold water) and turn them clockwise until they are completely closed. If you don’t have shut-off valves, you’ll need to turn off the main water supply to your house.
Step 2: Protect Your Sink
Place a towel or cloth in the sink to protect its surface from scratches and dings while you’re working.
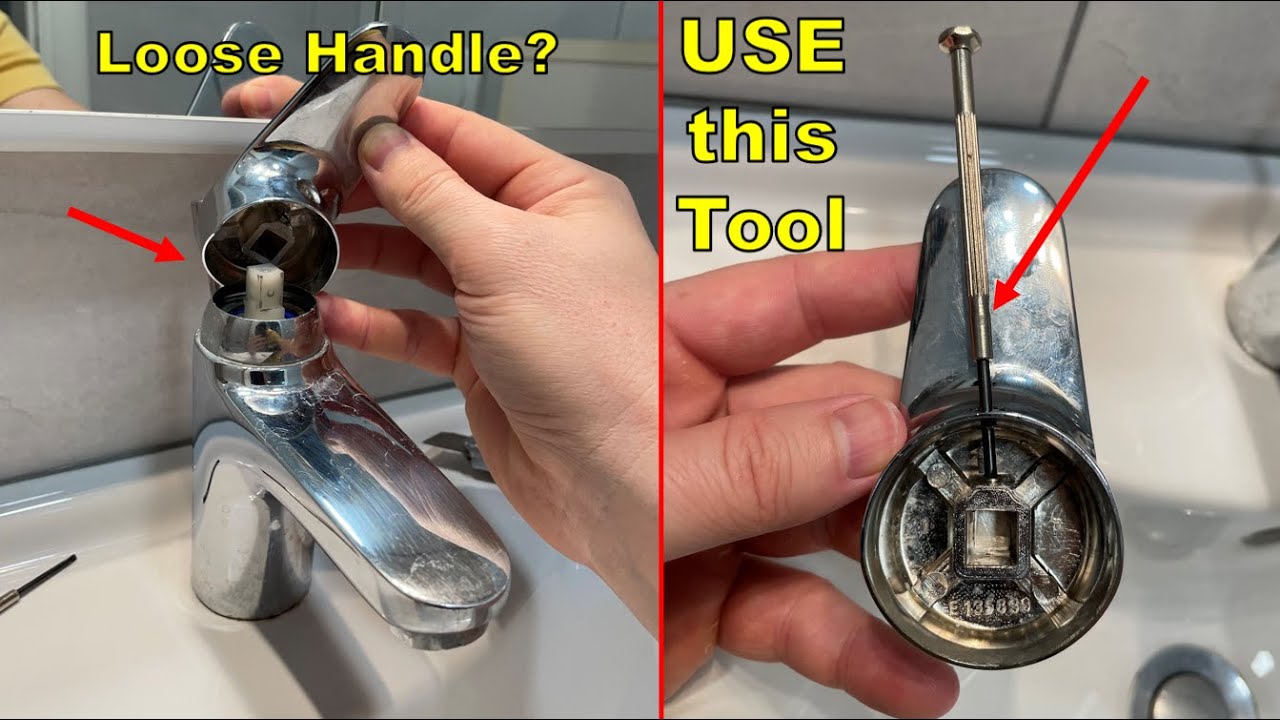
Step 3: Locate the Set Screw
Most single-handle faucets have a small set screw that secures the handle to the faucet stem. This screw is often hidden under a decorative cap or behind the handle. Look for a small indentation or opening on the handle. Use a small flathead screwdriver or Allen wrench to remove the cap or loosen the screw.
Step 4: Tighten or Replace the Set Screw
Once you’ve located the set screw, try tightening it. If the screw is stripped or damaged, replace it with a new one of the same size and type. Ensure the screw is snug but not overtightened, as this could damage the handle or stem.
Step 5: Check for Loose Nuts or Bolts
If tightening the set screw doesn’t solve the problem, check for loose nuts or bolts that secure the faucet handle assembly to the faucet body. Use an adjustable wrench to tighten any loose connections. Be careful not to overtighten, as this could damage the faucet.
Step 6: Inspect and Replace O-Rings and Washers
If the handle is still loose after tightening the set screw and checking for loose connections, the O-rings or washers beneath the handle may be worn out. Remove the handle assembly to access these components. Inspect them for cracks, tears, or wear. Replace any damaged O-rings or washers with new ones of the same size and type. Apply plumber’s grease to the new O-rings and washers before reassembling the faucet.
Step 7: Reassemble the Faucet and Test for Leaks
Once you’ve tightened the set screw, checked for loose connections, and replaced any worn-out O-rings or washers, reassemble the faucet. Turn the water supply back on slowly and check for leaks around the handle and faucet base. If you see any leaks, turn off the water supply and double-check your connections.
Troubleshooting Common Issues
Even with detailed instructions, you might encounter some challenges during the repair process. Here are some common issues and how to address them:
- Stripped Screws: If the set screw is stripped, you may need to use a screw extractor to remove it. Alternatively, you can try using a rubber band or steel wool to create a tighter grip between the screwdriver and the screw head.
- Corroded Parts: If parts are heavily corroded, soak them in white vinegar for several hours to loosen the corrosion. You may also need to use a wire brush to remove stubborn deposits.
- Difficulty Removing the Handle: If the handle is stuck, try applying penetrating oil around the base of the handle and letting it sit for a few minutes. You can also try gently tapping the handle with a rubber mallet to loosen it.
- Leaks After Repair: If you still have leaks after completing the repair, double-check all connections and ensure that all O-rings and washers are properly seated and lubricated.
Preventing Future Problems
Taking preventative measures can help extend the life of your faucet and prevent future issues with a loose handle.
- Regularly Tighten Screws: Periodically check the set screw and other screws on your faucet and tighten them as needed.
- Lubricate Moving Parts: Apply plumber’s grease to O-rings and washers every year or two to keep them lubricated and prevent wear.
- Clean Mineral Deposits: Regularly clean mineral deposits from around the faucet handle and base using white vinegar or a commercial cleaner.
- Use a Water Softener: If you have hard water, consider installing a water softener to reduce mineral buildup in your plumbing fixtures.
- Avoid Overtightening: When tightening screws or nuts, avoid overtightening, as this can damage the faucet components.
Choosing a High-Quality Replacement Faucet
Sometimes, despite your best efforts, a faucet is simply too old or damaged to repair effectively. In such cases, replacing the faucet is the best option. When choosing a replacement faucet, consider the following factors:
- Material: Look for faucets made from durable materials like solid brass or stainless steel.
- Finish: Choose a finish that is resistant to corrosion and scratches, such as chrome, brushed nickel, or oil-rubbed bronze.
- Features: Consider features like a pull-down sprayer, a high-arc spout, or touchless operation.
- Warranty: Choose a faucet with a generous warranty to protect against defects.
- Brand Reputation: Opt for a reputable brand known for quality and reliability. Many homeowners and plumbers recommend brands like Moen, Delta, and Kohler. Our extensive testing has shown these brands consistently outperform others in terms of durability and performance.
When to Call a Professional Plumber
While many faucet repairs are within the capabilities of a DIY homeowner, there are situations where it’s best to call a professional plumber:
- You’re Uncomfortable with Plumbing Repairs: If you’re not confident in your ability to diagnose and repair the faucet, it’s best to leave it to a professional.
- You Can’t Identify the Problem: If you’ve tried the troubleshooting steps above and you’re still unable to determine the cause of the loose handle, a plumber can help.
- You Encounter Complicated Plumbing Issues: If you encounter any complicated plumbing issues, such as damaged pipes or corroded fittings, it’s best to call a plumber.
- You’re Short on Time: If you’re short on time or you simply don’t want to deal with the hassle of repairing the faucet yourself, a plumber can quickly and efficiently resolve the issue.
Maintaining a Stable Faucet Handle
Fixing a kitchen handle single faucet loose at base doesn’t have to be a daunting task. By understanding the common causes, following the step-by-step instructions, and taking preventative measures, you can restore your faucet’s stability and prevent future problems. Remember to prioritize safety, take your time, and don’t hesitate to call a professional if you’re unsure about any step. A stable faucet handle not only improves the functionality of your kitchen but also helps prevent water waste and potential damage to your home. Share your own experiences with faucet repairs in the comments below, or explore our other guides for more home improvement tips.
