
Kitchen Sink Leaking at Base: Your Expert Guide to Diagnosis and Repair
Discovering your kitchen sink leaking at base is more than just an inconvenience; it’s a potential source of water damage, mold growth, and wasted money. This comprehensive guide provides you with the knowledge and tools to diagnose the cause of the leak, implement effective repairs, and prevent future problems. We’ll explore common culprits, step-by-step solutions, and expert tips to keep your kitchen dry and your mind at ease. Whether you’re a seasoned DIYer or a first-time homeowner, this resource will empower you to tackle a kitchen sink leaking at base with confidence.
Understanding the Anatomy of a Kitchen Sink and Its Plumbing
Before diving into leak diagnosis and repair, it’s crucial to understand the components of your kitchen sink and its plumbing system. This knowledge will make it easier to pinpoint the source of the leak and choose the appropriate solution.
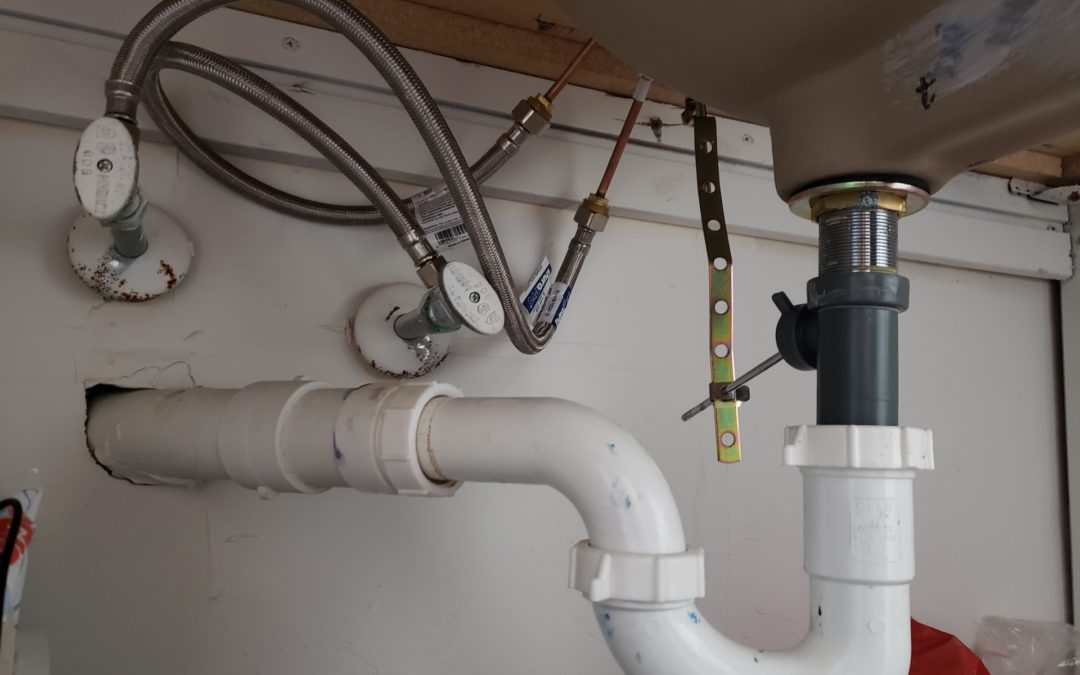
- The Sink Basin: The visible bowl of the sink, typically made of stainless steel, porcelain, or composite materials.
- The Drain Assembly: Located at the bottom of the sink basin, it includes the strainer basket, drain flange, rubber gaskets, and connecting pipes.
- The Tailpiece: The vertical pipe that connects the drain assembly to the P-trap.
- The P-Trap: A U-shaped pipe that traps debris and prevents sewer gases from entering your home.
- The Waste Arm: The horizontal pipe that connects the P-trap to the drainpipe in the wall.
- Supply Lines: Flexible hoses or rigid pipes that deliver hot and cold water to the faucet.
- Faucet: The fixture that controls the flow of water into the sink.
Common Causes of a Kitchen Sink Leaking at Base
A kitchen sink leaking at base can stem from various issues, each requiring a specific approach. Identifying the root cause is the first step towards a successful repair. Here are some of the most frequent culprits:
- Loose or Deteriorated Drain Connections: Over time, the connections between the drain assembly, tailpiece, P-trap, and waste arm can loosen or corrode, leading to leaks.
- Worn-Out Washers and Gaskets: Rubber washers and gaskets provide a watertight seal between plumbing components. These can dry out, crack, or become brittle with age, resulting in leaks.
- Corroded or Damaged Pipes: Corrosion, especially in older plumbing systems, can create pinhole leaks or weaken pipe connections. Physical damage, such as dents or cracks, can also cause leaks.
- Clogged Drain: A clogged drain can cause water to back up into the sink and overflow, potentially leaking around the base of the faucet or through loose drain connections.
- Faulty Faucet: Leaks around the base of the faucet can indicate a problem with the faucet itself, such as worn-out O-rings, loose connections, or a cracked faucet body.
- Damaged Sink Basin: Cracks or holes in the sink basin itself can cause leaks, particularly if the sink is made of a brittle material like porcelain.
- Improper Installation: Incorrect installation of the sink or its plumbing components can lead to leaks from the start or develop over time.
Step-by-Step Guide to Diagnosing a Kitchen Sink Leak
Before you start taking things apart, a careful inspection can often pinpoint the source of the kitchen sink leaking at base. Here’s how to conduct a thorough diagnosis:
- Clear the Area: Remove everything from under the sink to provide clear visibility.
- Dry the Area: Use paper towels or a cloth to dry all surfaces under the sink, including pipes, connections, and the cabinet floor. This will make it easier to spot the source of the leak.
- Run the Water: Turn on the faucet and let the water run for a few minutes. Observe carefully for any signs of leakage around the faucet base, drain assembly, and pipe connections.
- Check the Drain While Filling: Fill the sink basin with water and then let it drain. Watch for leaks around the drain flange, tailpiece, and P-trap.
- Inspect the Supply Lines: Check the supply lines for any signs of moisture or corrosion. Pay close attention to the connections at the faucet and the shut-off valves.
- Feel for Moisture: If you can’t see the leak, run your hand along the pipes and connections to feel for moisture.
- Use a Flashlight: A flashlight can help you see into tight spaces and identify hard-to-spot leaks.
Essential Tools and Materials for Kitchen Sink Repair
Having the right tools and materials on hand will make the repair process smoother and more efficient. Here’s a list of essentials:
- Basin Wrench: Used to loosen and tighten nuts in hard-to-reach places, such as the faucet connections.
- Pipe Wrench: Used to grip and turn pipes.
- Adjustable Wrench: A versatile wrench that can be adjusted to fit different sizes of nuts and bolts.
- Channel-Lock Pliers: Used to grip and turn objects, as well as to tighten or loosen connections.
- Screwdrivers (Phillips and Flathead): For removing and installing screws.
- Plumber’s Putty: Used to create a watertight seal around drain flanges and other connections.
- Teflon Tape: Used to seal threaded pipe connections.
- Replacement Washers and Gaskets: A variety of sizes and types to replace worn-out seals.
- New Drain Assembly (Optional): If the existing drain assembly is corroded or damaged beyond repair.
- New Faucet (Optional): If the faucet is the source of the leak and cannot be repaired.
- Bucket: To catch water during repairs.
- Towels or Rags: To clean up spills and dry surfaces.
- Safety Glasses: To protect your eyes from debris.
- Gloves: To protect your hands.
Repairing Leaks at Different Points Under the Sink
The repair method will vary depending on where the kitchen sink leaking at base originates. Let’s explore some common scenarios and their solutions:
Fixing Leaks at Drain Connections
If the leak is coming from the connections between the drain assembly, tailpiece, P-trap, or waste arm, try these steps:
- Tighten the Connections: Use a wrench to gently tighten the nuts on the connections. Be careful not to overtighten, as this can damage the pipes or connections.
- Replace Washers and Gaskets: If tightening the connections doesn’t stop the leak, remove the connections and inspect the washers and gaskets. Replace any that are worn, cracked, or brittle.
- Apply Plumber’s Putty: When reinstalling the drain flange, apply a bead of plumber’s putty around the underside of the flange to create a watertight seal.
Addressing Leaks from Supply Lines
Leaks in the supply lines are often caused by loose connections or damaged hoses. Here’s how to address them:
- Tighten the Connections: Use a wrench to tighten the connections at the faucet and the shut-off valves.
- Replace the Supply Lines: If tightening the connections doesn’t stop the leak, or if the supply lines are corroded or damaged, replace them with new ones.
- Use Teflon Tape: When connecting the supply lines to the faucet and shut-off valves, wrap the threaded connections with Teflon tape to create a watertight seal.
Dealing with Faucet Leaks
Leaks around the base of the faucet can be tricky to repair, as they often require disassembling the faucet. Here’s a general approach:
- Identify the Source of the Leak: Determine whether the leak is coming from the faucet body, the spout, or the handle.
- Consult the Faucet’s Manual: Refer to the faucet’s manual for specific instructions on disassembling and repairing the faucet.
- Replace Worn Parts: Replace any worn-out O-rings, cartridges, or other parts that may be causing the leak.
- Consider Replacing the Faucet: If the faucet is old, corroded, or beyond repair, it may be more cost-effective to replace it with a new one.
Preventing Future Kitchen Sink Leaks
Prevention is always better than cure. Here are some tips to prevent future kitchen sink leaking at base:
- Regularly Inspect Your Plumbing: Check under your sink regularly for any signs of leaks or corrosion.
- Tighten Connections Periodically: Use a wrench to periodically tighten the nuts on the drain connections and supply lines.
- Replace Worn Washers and Gaskets: Replace any worn-out washers and gaskets as soon as you notice them.
- Avoid Clogging Your Drain: Prevent clogs by avoiding pouring grease down the drain and using a strainer to catch food particles.
- Flush Your Drain Regularly: Flush your drain with hot water and baking soda to prevent buildup.
When to Call a Professional Plumber
While many kitchen sink leaking at base can be fixed with DIY methods, some situations require the expertise of a professional plumber. Consider calling a plumber if:
- You’re unable to identify the source of the leak.
- The leak is coming from a damaged pipe or fitting that requires soldering or welding.
- You’re uncomfortable working with plumbing.
- You’ve tried to repair the leak yourself, but it’s still leaking.
Choosing the Right Products for Sink Repair
Selecting high-quality replacement parts and materials is essential for a lasting repair. For example, when replacing drain components, opt for durable materials like stainless steel or brass over plastic. When choosing plumber’s putty or Teflon tape, select reputable brands known for their reliability. Investing in quality products will minimize the risk of future leaks and ensure the longevity of your repair.
The Long-Term Benefits of Addressing a Leaking Sink
Addressing a kitchen sink leaking at base promptly offers numerous long-term benefits. Firstly, it prevents water damage to your cabinets, flooring, and walls, saving you potentially thousands of dollars in repair costs. Secondly, it eliminates the risk of mold growth, which can pose serious health hazards. Thirdly, it conserves water and reduces your water bill. Finally, it provides peace of mind knowing that your kitchen is safe and dry.
Taking Control of Your Kitchen Plumbing
Dealing with a kitchen sink leaking at base can be frustrating, but with the right knowledge and tools, it’s a manageable problem. By understanding the causes of leaks, following a step-by-step diagnostic process, and implementing appropriate repairs, you can effectively stop the leak and prevent future problems. Remember to prioritize safety, use quality materials, and don’t hesitate to call a professional plumber when needed. With these tips, you can keep your kitchen plumbing in top condition and enjoy a leak-free home.
