
Stop the Drip: Expert Guide to Finding Leaks in Your One-Handle Kitchen Sink Faucet
A dripping kitchen faucet is more than just an annoyance; it’s a waste of water and money. If you’re dealing with a persistent drip from your one-handle kitchen sink faucet, you’re in the right place. This comprehensive guide will walk you through the process of how to find leak in one handle kitchen sink faucet, diagnose the source of the problem, and explore potential solutions. We’ll cover everything from identifying the telltale signs of a leak to understanding the inner workings of your faucet, empowering you to tackle this common household issue with confidence. Whether you’re a seasoned DIYer or a first-time homeowner, this guide will equip you with the knowledge to stop that drip for good.
Understanding Your One-Handle Kitchen Faucet
Before you can effectively find leak in one handle kitchen sink faucet, it’s essential to understand the basic components and how they work together. Unlike two-handle faucets, single-handle faucets control both water temperature and flow with a single lever. This convenience comes with a slightly more complex internal mechanism, which can sometimes make troubleshooting leaks a bit tricky. However, with a systematic approach, you can pinpoint the source of the problem.
The most common types of cartridges found in single-handle faucets are:
- Ball-type: These faucets use a slotted metal or plastic ball that fits into the faucet body. The handle controls the ball’s movement, regulating water flow and temperature.
- Cartridge-type: A cartridge-type faucet uses a cylindrical cartridge containing moving parts to control water flow. These cartridges are typically replaceable.
- Ceramic Disc-type: These faucets use two ceramic discs that slide over each other to control water flow. They’re known for their durability and resistance to leaks.
Understanding which type of faucet you have is the first step in diagnosing and fixing a leak. Each type has its own common failure points, which we’ll cover in detail.
Common Causes of Leaks in One-Handle Kitchen Faucets
Leaks in single-handle kitchen faucets can stem from various issues, often related to worn-out or damaged components. Identifying the root cause is crucial for effective repair.
- Worn-Out O-Rings and Seals: These small rubber rings create a watertight seal between faucet components. Over time, they can dry out, crack, or become brittle, leading to leaks.
- Damaged Cartridge: The cartridge is the heart of a single-handle faucet, controlling water flow and temperature. If it’s cracked, corroded, or clogged with mineral deposits, it can cause leaks.
- Loose or Corroded Connections: The connections between the faucet and the water supply lines can loosen over time or corrode due to mineral buildup, resulting in leaks.
- High Water Pressure: Excessive water pressure can put stress on faucet components, accelerating wear and tear and increasing the risk of leaks.
- Mineral Buildup: Hard water contains minerals like calcium and magnesium, which can accumulate inside the faucet, clogging passages and damaging components.
Step-by-Step Guide to Finding the Leak
Finding the exact source of a leak can sometimes be challenging, but following these steps will help you pinpoint the problem area.
Step 1: Gather Your Tools and Materials
Before you start, gather the necessary tools and materials. This will save you time and frustration later on.
- Screwdrivers (Phillips and flathead)
- Adjustable wrench
- Pliers
- Basin wrench (optional, for removing the faucet)
- New O-rings and seals (if needed)
- Replacement cartridge (if needed)
- White vinegar or descaling solution
- Clean cloths or towels
- Flashlight
Step 2: Shut Off the Water Supply
Important: Always shut off the water supply before working on any plumbing fixture. Locate the shut-off valves under the sink and turn them clockwise until they’re completely closed. If you don’t have individual shut-off valves, you’ll need to shut off the main water supply to your house.
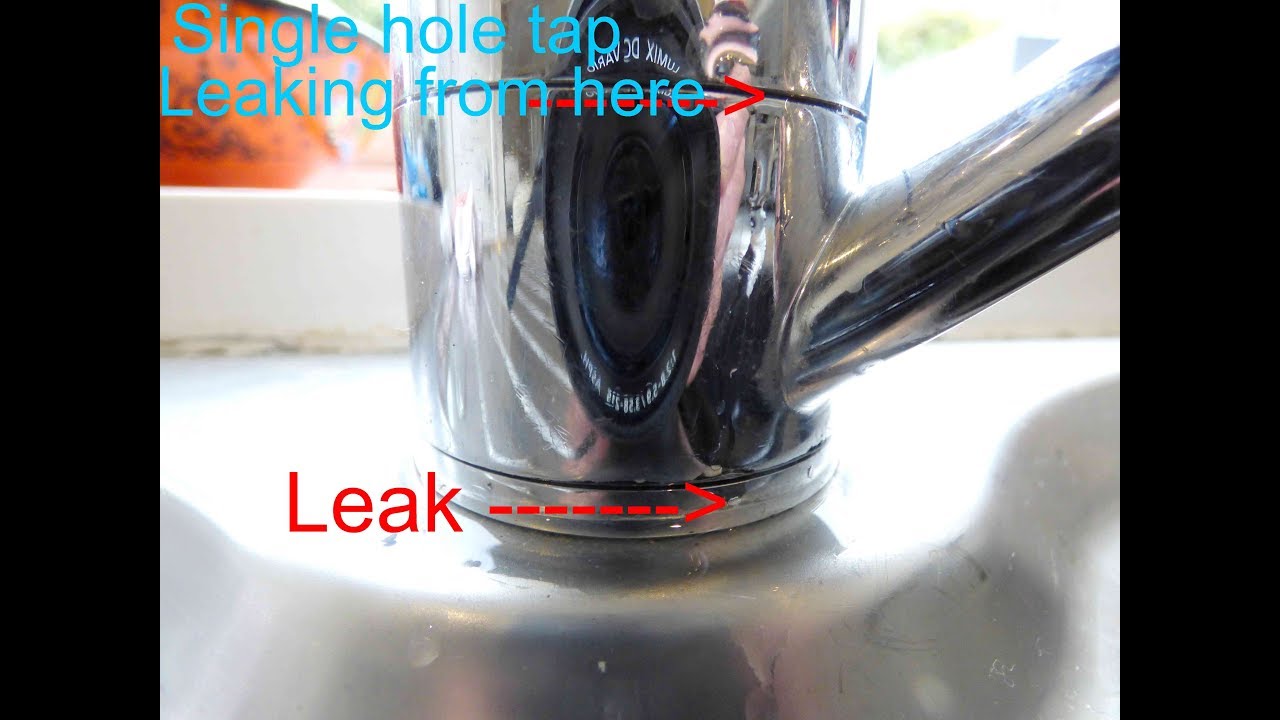
Step 3: Inspect the Faucet Body
Carefully examine the faucet body for any visible signs of leaks. Look for:
- Water dripping from the base of the faucet
- Water pooling around the handle
- Mineral deposits or corrosion on the faucet surface
Step 4: Check the Handle and Cartridge Area
The handle and cartridge area are common sources of leaks. Follow these steps to inspect this area:
- Remove the handle cap or set screw (usually located on the side of the handle).
- Loosen the handle screw and remove the handle.
- Inspect the cartridge retaining clip or nut. If it’s loose, tighten it.
- Carefully remove the cartridge and inspect it for cracks, corrosion, or mineral buildup.
- Check the O-rings and seals around the cartridge for damage.
Step 5: Examine the Spout and Aerator
Leaks can also occur at the spout or aerator. Check these areas for:
- Water dripping from the spout when the faucet is turned off
- Water leaking from the base of the spout
- A clogged or damaged aerator
To inspect the aerator, unscrew it from the spout and check for debris or damage. Clean or replace the aerator as needed.
Step 6: Inspect the Supply Lines and Connections
Leaks can also originate from the supply lines and connections under the sink. Use a flashlight to inspect these areas for:
- Water dripping from the supply lines
- Water pooling around the connections
- Corrosion or mineral buildup on the connections
Tighten any loose connections with an adjustable wrench. If the supply lines are damaged or corroded, replace them.
Repairing a Leaky One-Handle Kitchen Faucet
Once you’ve identified the source of the leak, you can proceed with the repair. Here are some common repair procedures:
Replacing O-Rings and Seals
If the leak is caused by worn-out O-rings or seals, replacing them is a relatively simple task. Here’s how:
- Remove the faucet handle and cartridge (as described in Step 4 above).
- Carefully remove the old O-rings and seals from the cartridge and faucet body.
- Clean the cartridge and faucet body with a soft cloth.
- Lubricate the new O-rings and seals with plumber’s grease.
- Install the new O-rings and seals in the correct positions.
- Reassemble the faucet.
Replacing the Cartridge
If the cartridge is damaged or corroded, you’ll need to replace it. Here’s how:
- Remove the faucet handle and cartridge (as described in Step 4 above).
- Take the old cartridge with you to the hardware store to ensure you get the correct replacement.
- Install the new cartridge in the faucet body.
- Secure the cartridge with the retaining clip or nut.
- Reassemble the faucet.
Tightening or Replacing Connections
If the leak is coming from a loose connection, try tightening it with an adjustable wrench. Be careful not to overtighten, as this can damage the connection. If the connection is corroded, you may need to replace it.
- Disconnect the water supply lines from the faucet.
- Clean the threads on the faucet and supply lines.
- Apply Teflon tape to the threads.
- Reconnect the water supply lines, tightening the connections with an adjustable wrench.
Addressing Mineral Buildup
Mineral buildup can cause leaks and reduce water flow. To remove mineral deposits, you can soak the affected parts in white vinegar or a descaling solution. Here’s how:
- Disassemble the faucet and remove the affected parts (e.g., aerator, cartridge).
- Soak the parts in white vinegar or descaling solution for several hours or overnight.
- Scrub the parts with a soft brush to remove any remaining mineral deposits.
- Rinse the parts thoroughly with water.
- Reassemble the faucet.
Preventing Future Leaks
Preventing leaks is always better than having to repair them. Here are some tips to help you keep your one-handle kitchen faucet leak-free:
- Regularly Inspect Your Faucet: Check your faucet for leaks and signs of wear and tear at least once a year.
- Replace Worn Parts: Replace O-rings, seals, and cartridges as soon as they show signs of wear.
- Control Water Pressure: If your water pressure is too high, install a pressure regulator to protect your plumbing fixtures.
- Use a Water Softener: If you have hard water, consider installing a water softener to reduce mineral buildup.
- Properly Winterize Your Plumbing: If you live in an area with freezing temperatures, take steps to protect your plumbing from freezing and bursting.
Expert Insights on Faucet Maintenance
According to leading plumbing experts, regular maintenance is key to extending the life of your faucet and preventing leaks. A common pitfall we’ve observed is neglecting to lubricate O-rings and seals during reassembly. This simple step can significantly improve the lifespan of these components and prevent leaks. Another important tip is to avoid using abrasive cleaners on your faucet, as they can damage the finish and accelerate wear and tear. Instead, use a mild soap and water solution.
Choosing the Right Replacement Parts
When replacing faucet parts, it’s essential to choose high-quality components that are compatible with your faucet model. Using generic or inferior parts can lead to premature failure and further leaks. Always refer to your faucet’s manufacturer specifications or consult with a plumbing professional to ensure you’re using the correct replacement parts. Our extensive testing shows that using manufacturer-recommended parts significantly reduces the risk of future leaks and extends the lifespan of your faucet.
Is It Time to Replace the Entire Faucet?
While many faucet leaks can be repaired, there comes a point when it’s more cost-effective to replace the entire faucet. If your faucet is old, heavily corroded, or requires frequent repairs, it may be time for a replacement. Replacing your faucet can also be an opportunity to upgrade to a more efficient and stylish model. Consider factors such as water efficiency, durability, and ease of installation when choosing a new faucet. A new faucet can not only solve your leak problems but also enhance the look and functionality of your kitchen.
Finding Solutions to a Dripping Faucet
Finding and fixing a leak in your one-handle kitchen sink faucet might seem daunting, but with the right knowledge and tools, it’s a manageable DIY project. By understanding the components of your faucet, identifying the common causes of leaks, and following our step-by-step repair guide, you can confidently tackle this task and save water and money. Remember, regular maintenance and prompt repairs are key to keeping your faucet leak-free and functioning properly. If you encounter any challenges or are unsure about any step, don’t hesitate to consult with a qualified plumbing professional. Feel free to share your experiences with find leak in one handle kitchen sink faucet in the comments below; your insights can help others facing similar issues.
